


FAQ
You just bought a brand, spanking new bike. It is crucial that you properly warm up the bike prior to riding a new or rebuilt engine.
It's clean, shiny and not a scratch or dent on it. It's perfect. You may even think perhaps its best as a show bike. Why mess it up? That'll pass soon enough and once the urge to ride takes over you'll want to get it dirty as quickly as possible.
But first things first. You can't just gas up and ride it like James Stewart on the last lap of a Supercross race. Or can you?
Many, many opinions exist on how to properly break in a new engine. Lots of methods get passed down through family tradition and if your dad showed you how he broke in a dirt bike engine, you'll follow his advice, and your kids, your advice.
Today's powersports engines are vastly different than engines from the 1970s. But two facts remain, it's still an engine with lots of tiny parts moving at high rates of speed. Secondly, you want it to last a long time. Breaking in an engine helps seal the pistons rings into the cylinder surface. Without a proper seal you end up with engine issues, sometimes sooner rather than later, but almost always inevitably later.
During Break-in and after the first tank of gas, change your oil. Know that metal shavings will be in the oil and need to be flushed out. Drain the day's oil and change the filter (if applicable).
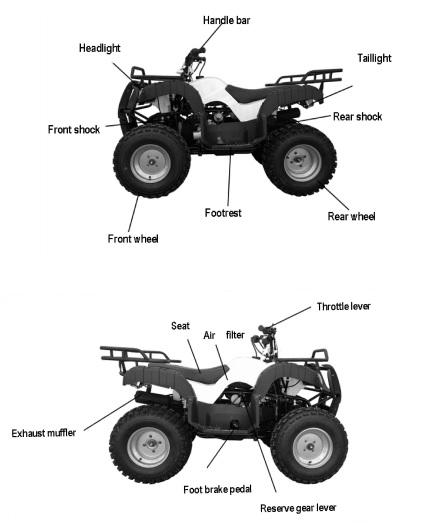
HOW-TO GET STARTED:
(ALWAYS USE PROTECTIVE GEAR WHEN RIDING OR WORKING ON YOUR ATV)
1- Hook up battery, and assemble the rest of the unit.
2- FOR WHEEL ASSEMBLY (follow assembly instructions that came with your ATV this is just a brief overview), the wheel goes on first, then the wheel spacer (kinda pushes up underneath the hub), then flange washer, then the castle nut (finger tight), then tighten the nut down further until you can insert the cotter pin through the hole in the castle nut and the hole in the axle, Insert cotter pin. *USE LOCTITE ON EVERY NUT AND BOLT ON YOUR ATV TO ENSURE NO LOSS OF PARTS OR FUNCTIONALITY DURING RIDES. ALWAYS CHECK FOR LOOSE NUTES AND BOLTS BEFORE RIDING.
3- Make sure the top of the carburetor (Throttle Body Top, it's a round cap that connects the throttle cable to the carburetor) is screwed down tightly and is secure BEFORE EACH RIDE. If this cap comes off your ATV will rev at full throttle during a ride and may cause a crash.
4- Use high 93 octane gasoline or Ethanol Free. Jets in the carb jets are very small and lower grade gasoline will clog them.
5- Make sure the throttle cable is pushed all the way into the top of the black rubber holder at the very top of the carburetor. AGAIN the top of the carburetor needs to be screwed down all the way down.
6– Put the key in the ATV. Turn key to ON.
7- Fully choke the unit. We have two different models of chokes. One has the choke on the left handle bar (horizontal movement). The other has a vertical movement choke on the left side of the carburator. This carburetor of course is up under the plastic body of the atv. To start the unit, it has to be choked (left handle bar choke- slider should be all the way to the left (fully choked), other type=Carburator choke- slider should be all the way up (fully choked).
8- Make sure that your RED KILL Switch is on the "C" not the "X"
9- Make sure that you press the brake in. Whether it is hand or foot, this is a safety mechanism and your atv will only start when holding in the brake.
10- Push starter button on left handle bar which is yellow on some models, it is a black button on other models, which is below the red kill switch.
11- Then turn the choke off and NOW work the throttle to keep it going while it warms up. (if you leave the choke up while running or idling you will FOUL your spark plug because you are too rich and the spark plug turns black).
12- After starting, Let it idle for 2-3 minutes and then you are ready to ride the ATV.
13- Adjust maximum riding speed - When NOT riding the atv, adjust the maximum speed control with the black long screw that sticks out of the right handle grip (see picture). When you loosen the screw, it increases the maximum speed, when you screw it in, it reduces the maximum speed. After adjusting the maximum speed to the desired setting, tighten the nut around the bolt tightly so that the bolt does not fall out. Also if the bolt is free to vibrate, it will change your maximum speed setting.
14- Drive HALF SPEED for your first tank of gas and then drain oil. Use dipstick to make sure that there is enough engine oil. Your ATV uses REGULAR 4-Stroke oil 10W30, 10w40 or 15w40. Once it is broke in, and after your first FULL TANK of gas, you change the oil. After you change your oil, you are free to ride your atv at the speed setting you choose.
15- Moving forward from this point we recommend that you change your engine oil every 3-6 months. Why change the oil so frequently you ask? Your bike engine works much harder than your automobiles engine. This will cause the lubricating oil to fail and break down at a greatly accelerated rate. So…you need to change the oil in your bike much more often than your car. Again…it’s only one quart of oil, so buy your bike the very best oil!